Menjalankan Android di PC alias Virtual menggunakan Genymotion

Written By Unknown on Wednesday, October 30, 2013 | 3:49 PM


Sistem Operasi yang disarankan adala...........
  1. Microsoft Windows XP SP3 (32 or 64 bits)
  2. Microsoft Windows Vista (32 or 64 bits)
  3. Microsoft Windows 7 (32 or 64 bits)
  4. Linux Ubuntu 12.04
  5. Linux Ubuntu 12.10
  6. Linux Debian Wheezy
  7. Mac OS X 10.6
Syaratnya lagi....(ik dicampur bahasa ingriissshhgaya sit)
  1. OpenGL 2.0 capable graphic card, with an up-to-date driver
  2. VT-x or AMD-V capable CPU, enabled in BIOS settings
  3. At least 2GB of RAM memory
  4. At least 100 MB of free space on Hard Drive for Genymotion installation)
    A minimum of 2GB of free space is required to deploy each Genymotion virtual devices. They might need more than 8 GB depending on your usage of the virtual devices and the applications you have installed.
  5. Internet connection (installation and updates)
  6. Screen resolution greater than 1024 x 768 pixels
Aplikasi yang dibutuhkan...
  1. Oracle VirtualBox >= 4.1(VirtualBox versi 4.1 keatas atau yang lebih anyar...nyar..nyar...)
Cara Installasi

  • Windows
    1. Double click on msi installer
    2. Choose the installer language (the Genymotion language depends of your system language) and click on Next button
    3. Click on Next button again
    4. Change the path if needed (the default path is C:\Program Files\Genymobile\Genymotion) then click on Next button
    5. Click on Next button again
    6. Choose weither or not create desktop icon. Then click on Next button
    7. Click on Install button
    8. Click on Finish button
  • MacOS X
    1. Open the dmg installer
    2. Move Genymotion and Genymotion shell to application directory
  • Linux
    In a terminal:
     chmod +x [InstallerPath]/genymotion.bin
                      [InstallerPath]/genymotion.bin

    Selanjutnya silahkan baca disinihh ane lagi males nulis..hihihihihi.,., :p
3:49 PM | 0 comments | Read More

Step by step Installasi Android Jelly Bean 4.3 for PC x86

Written By Unknown on Thursday, September 19, 2013 | 8:24 AM

Berikut ini saya sharing Step by step Installasi Android Jelly Bean 4.3 for PC x86, silahkan download dulu materialnya alias ISO Installer-nya disini :
http://code.google.com/p/android-x86/downloads/detail?name=android-x86-4.3-20130725.iso
Kita bisa BURN file ISO tersebut ke sebuah CD Blank ataupun langsung mengunakannya sebagai BOOTABLE CD pada Virtual PC dengan VMWare Workstation, VirtualBox ataupun MS Virtual PC… Selamat mencoba…


8:24 AM | 1 comments | Read More

Membuat Web Menggunakan Ubuntu Server

Written By Unknown on Monday, August 19, 2013 | 5:41 PM


Gak pake basa-basi ya gan, ane langsung aja kasih bahan-bahan yang perlu di install!

  • Install apache
  • sudo apt-get install apache2
  • Install database server
  • sudo apt-get install mysql-server
  • Install PHP untuk Apache
  • sudo apt-get install php5
  • Install MySql untuk Apache 
  • sudo apt-get install libapache2-mod-auth-mysql
  • sudo apt-get install php5-mysql
  • sudo apt-get install phpmyadmin 
selanjutnya letakkan didalam folder ./var/www/
di folder itulah web anda berada.,., sekian dan terimakasih, jika ada yang ditanyakan silahkan berkomentar.,. :D
5:41 PM | 0 comments | Read More

menambah memori internal pada custom rom cm7,cm9,cm10,cm10.1

Written By Unknown on Monday, August 12, 2013 | 3:45 PM


sblm ny memori sudah di partisi jd ext2/ext3/ext4 pke kompi/lepi terserah.
klo blm tau cara partisi memori cari aja di mbah google yaa.. lol
download script nya :fixed-int2ext-android-4.zip
instal script :3. Reboot ke CWM4. masuk ke "mount and storage"5. Ubah "Mount data" menjadi "Unmount data"6. Ubah "Mount system" menjadi "Unmount system"setelah itu kembali ke Menu utama CWM7. lalu pilih "instal zip from sdcard"8. pilih lagi "chose zip from sdcard">9. pilih file script yang sudah anda download td10. tunggu proses hingga selesaijika sudah selesai, kembali ke menu utama CWM lalu rebootgood luck!

3:45 PM | 0 comments | Read More

Cara Memperbaiki Aki Basah Yang Rusak atau Sudah Tidak Nyala

Written By Unknown on Sunday, August 11, 2013 | 11:47 PM


Aki / accu mati atau soak sering di buang begitu saja oleh pemiliknya. Menurut saya, aki yang sudah mati masih bisa di hidup kan lagi dengan hanya bermodal 5ribu rupiah saja.
Ini berdasarkan pengalaman pribadi yang belum pernah di upload oleh siapapun.
Bahan yang di butuh kan :
  1. Air Zur / air aki yang warna tutup botol nya merah
  2. Garam dapur yang halus (ber yodium)
  3. Alat suntik
  4. 1 gelas akua
  5. 1 timba air bersih
  6. kain lap bersih

Caranya :
Persiapkan cairan yang akan kita masukkan kedalam tiap tiap lubang pada aki, yaitu dengan mencampurkan satu sendok makan garam kedalam satu gelas akua, aduk hingga rata. Sebelumnya Keluar kan terlebih dahulu semua isi dari aki tersebut ( untuk aki basah ). setelah keluar semua, cuci aki tersebut dengan air biasa dengan memasukkannya pada tiap tiap lubang aki sampai semua kotoran nya keluar. setelah dirasa cukup, suntik cairan garam tadi kedalam tiap tiap lubang aki hingga 2 cm dari mulut lubang.
Biasanya akan di ikuti reaksi dengan di tandai keluar gelembung udara. Jangan hirup udara yang akan keluar dari tiap tiap lubang pada aki. Setelah itu, charger aki selama 10 menit. Setelah 10 menit di charger, keluarkan air garam yang ada di dalam aki tadi dan cuci kembali seperti tadi. setelah dirasa sudah sangat bersih, baru masukkan air zur / air aki yang tutup botolnya merah hingga 2 cm dari mulut lubang. Charger aki higga penuh. Lap aki tadi hingga bersih. Kemudian anda bisa memasangnya pada kendaraan anda.
11:47 PM | 0 comments | Read More

Cara Membuat Ad-Hoc di Windows 8

Written By Unknown on Tuesday, July 23, 2013 | 12:06 PM

Kali ini saya kasih tau cara membuat Ad-Hoc pada Windows 8, karena saya yakin shobat bloger bingung caranya gimana..hehehe.,.,langsung aja sobat buka "CMD" atau "Command Prompt" ingat ya.,."Run Administrator" jangan lupa!

berikut caranya:
  1. saya asumsika "CMD"(Command Prompt) udah dibuka melalui RUN ADMINISTRATOR
  2. ketik perintah berikut di CMD
    netsh wlan set hostednetwork mode=allow ssid=NAMA key=PASSWORD
    NAMA = isi dengan nama yang akan sobat bloger buat
    PASSWORD = isi dengan 8-16 karakter
  3. untuk mengaktifkan ketik perintah berikut di CMD
    netsh wlan start hostednetwork
  4. untuk mematikan ketik perintah berikut di CMD
    netsh wlan stop hostednetwork
itu saja yang dapat saya tulis untuk kali ini, semoga bermanfaat bagi sobat blogger semua! ^_^

12:06 PM | 0 comments | Read More

Use swap to get much more performance !

Written By Unknown on Thursday, July 18, 2013 | 6:15 PM

What is Swap?


Linux divides its physical RAM (random access memory) into chucks of memory called pages. Swapping is the process whereby a page of memory is copied to the preconfigured space on the hard disk, called swap space, to free up that page of memory. The combined sizes of the physical memory and the swap space is the amount of virtual memory available.

Swapping is necessary for two important reasons. First, when the system requires more memory than is physically available, the kernel swaps out less used pages and gives memory to the current application (process) that needs the memory immediately. Second, a significant number of the pages used by an application during its startup phase may only be used for initialization and then never used again. The system can swap out those pages and free the memory for other applications or even for the disk cache.

However, swapping does have a downside. Compared to memory, disks are very slow. Memory speeds can be measured in nanoseconds, while disks are measured in milliseconds, so accessing the disk can be tens of thousands times slower than accessing physical memory. The more swapping that occurs, the slower your system will be. Sometimes excessive swapping or thrashing occurs where a page is swapped out and then very soon swapped in and then swapped out again and so on. In such situations the system is struggling to find free memory and keep applications running at the same time. In this case only adding more RAM will help.

Linux has two forms of swap space: the swap partition and the swap file. The swap partition is an independent section of the hard disk used solely for swapping; no other files can reside there. The swap file is a special file in the filesystem that resides amongst your system and data files.  

I want that on my Phone, how to do that?
Okay, here goes the real story. Since Android is Linux, that would be possible.

What is needed:

  • Fast (Class 10) Micro-SD Card, if you dont have class 10, class 4 would be great too..
  • CWM or Partitioning software
  • Root (of course)
  • Terminal Emulator app
  • Kernel with swap and init.d support (for example our CM7, 9, 10 and 10.1 ROM)
  • Root Exploring app (for example Root Browser or Root Explorer 

Steps:
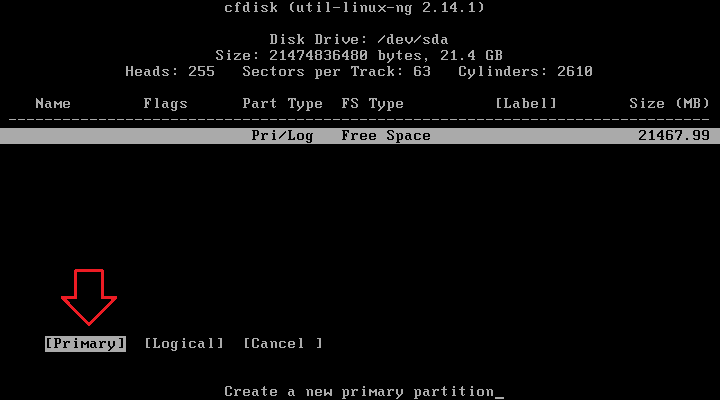
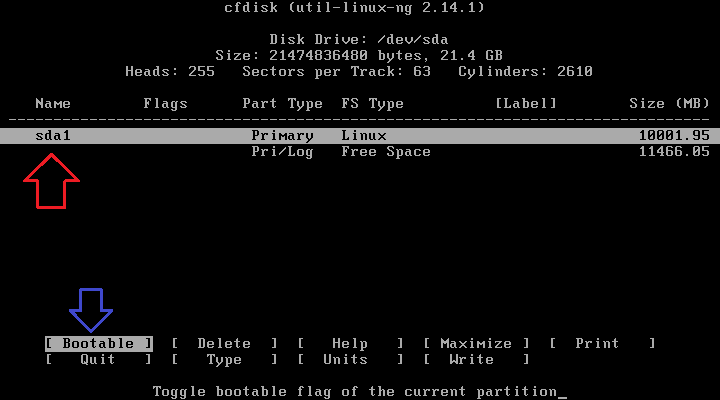
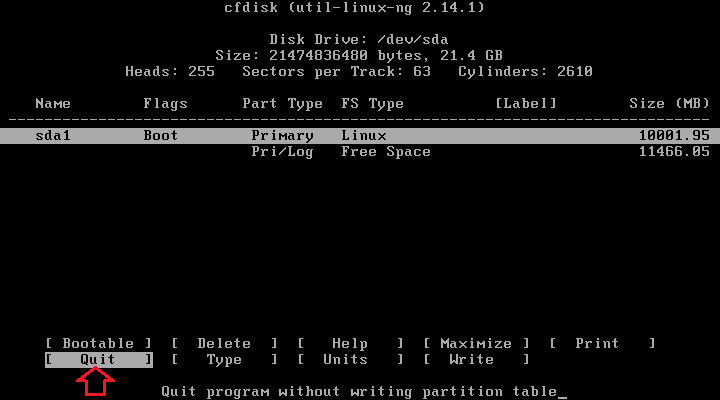
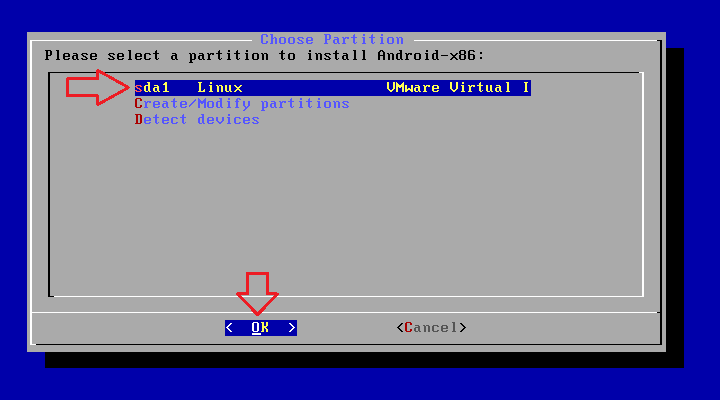
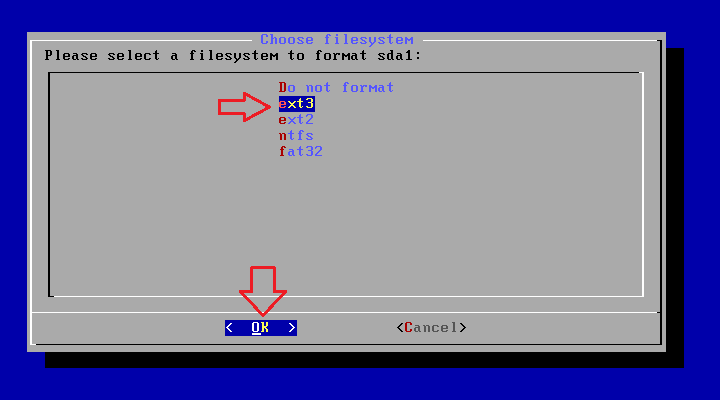
  1. Partition your SD Card, Ask Google how to do that. Make new Swap partition, or you want SD-ext too..
  2. Open Terminal Emulator, do:
    su
    fdisk -l dev/block/mmcblk0
  3. You'll see something like this:
    /dev/block/mmcblk0p3            1861        1924      514080  82 Linux swap
  4. Do the following code, change with your exact swap partition:
    su
    swapon /dev/block/mmcblk0p3
  5. Now you can check your swap partition by doing: 
    free

Now we create the script to do that automatically at boot
  1. Open Root exploring apps, head to /system/etc/init.d
  2. Make a new file, named 05swap 
  3. Edit that file, copy this up:
    #!/system/bin/sh
    echo Swap enabled
    swapon -a
  4. Save it and change the permission to :
  5. Now head to /system/etc and create new file named fstab 
  6. Open it and enter this:
    /dev/block/mmcblk0p3 swap swap
Now we set the swappiness value
*the normal value is 60, but you can change to what number you want (max 100). Higher may help to improve overall performance, while setting it to lower may increase interactivity and overall stability.
  1. Do this on Terminal Emulator
    su
    echo vm.swappiness=60 >> /system/etc/sysctl.conf
  2. Reboot and you're done.

6:15 PM | 0 comments | Read More